Friday, 28 February 2014

Ivy Part 2

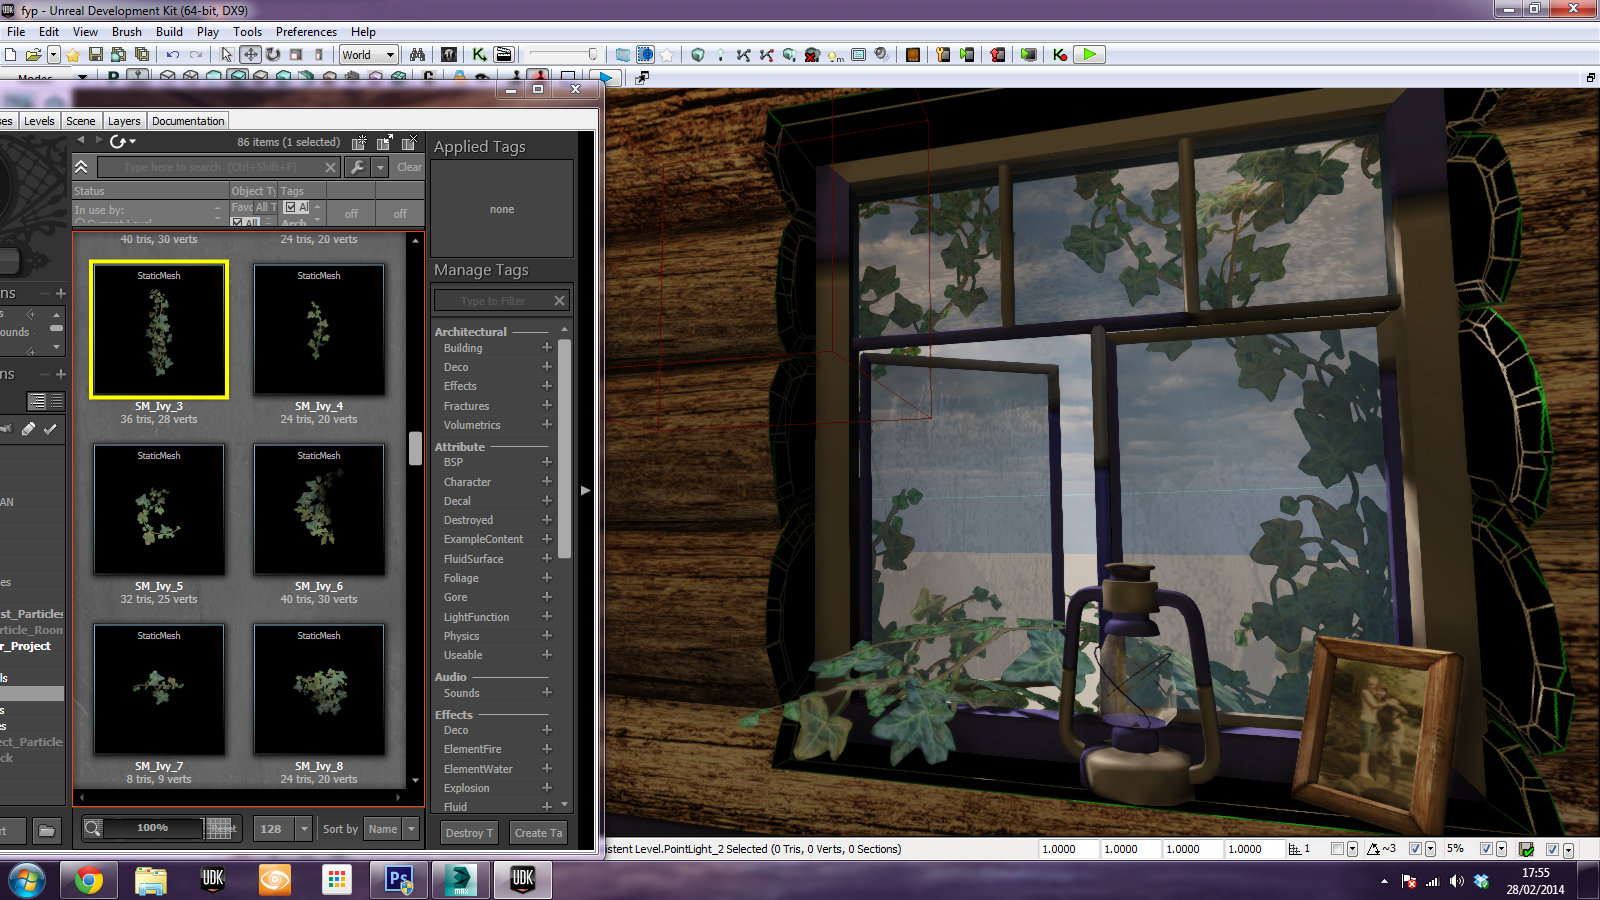
I did the bake today! I really like how its turned out! I've had so much more fun than I thought I would creating the foliage! I don't even care how geeky it sounds! I cant wait till university is finished so I can create the exterior(cause lets face it I wont get that done and finish everything else in 3 weeks!)
I noticed the normals created from the bake are mucking up around the edges. Note To Self: FIX THIS!
Other than that I think its looking really well. Obviously its not the best ivy however I am quite proud of myself. I am happy with the turn out and it looks lovely from inside the windows, I think it helps break up the colours too. I am debating having it on the inner wall creeping from the door way? ill have a tinker about with it see what that looks like :)


Thursday, 27 February 2014

Ivy

Today I dedicated the day to ivy. I thought its best to do it now instead of later on down the line and getting slightly stuck with it/ spending too much time figuring it out. I started off with an independent Ivy generator. it was god however its not the best for use in game. I knew I would have to bake the meshes down and I could only use two textures (that I knew of).


 After playing around with the various tools and software I decided to make some myself and give that a try, I found a tutorial a while back and saved the jpeg and cant remember where I found it. (tutorials at the end of the post).
Using this tutorial endured that the scans I cleaned up last night didn't go to waste. At first I was just experimenting however I got so involved in it all that I am now using these for the main thing. plus ideally I don't have the time to go back.
I learnt a new tool as well while creating the ivy. The object paint tool. Its extremely handy and hopefully ill be able to utilise this tool in the future. I've had so much fun creating the ivy and I am quite impressed with the high poly versions. unfortunately this wont run in game so I still need to bake down into planes yet. I will be sure to get some good high poly renders though ;) I plan to create small pieces that will fit together in UDK to create larger masses.

Wednesday, 26 February 2014

Catch up

Hello again. So over the weekend i went home to visit family, i tried to get work done however its very difficult to juggle that and helping the family out. these past few days I've hardly done any work as well. i know i need to kick this mood in the arse and step it up a gear and hopefully ill be sorted. so over the past few days I've added the texture (uncompleted) to the upper wall with the window, its helping to give an over all feel to the scene a bit better. 

I finished creating the drawing decals for the paper upstairs i think i need to redo the alpha maps on one of them though as you cant really see the lines. when playing the level however if you zoom in close in the editor you can see it to an acceptable level. I will only go back and redo this if i have time at the end. I ended up creating them as a decal instead of creating multiple textures. These are of a 512 size.
i created the normal for the mattress. I used an image from CGTextures to create it. I think it helps to give the mattress a bit of a pop, i also added a dirty overlay so the bed didn't look pristine clean. I also started on the texture for the bed frame, the crates, boxes and the roof beams. I will post an updated screenshot later on in the week with the textures on the model.
Today i went and collected some ivy and probably got some weird looks by doing so. I then scanned them in as shown below (this is the darker scan of around 5). I figured having a range of leaves will help in creating the overall plant. I hope to create these sooner rather than later and get them in engine ASAP.

Wednesday, 19 February 2014

Fireplace

So I didn't start with the light map like I said I would. I opened the file and got a little carried away with the high poly version. Its going well, just taking a bit of time to get these chamfer lines in. 
Well the high to low bake took ages!! I spent way to much time on this or at least I thought I wouldn't be spending this much time on it! each render took a significant amount of time that I managed to complete the layout to my new portfolio and add a few images! I had to render each section out in a different map due to the UV overlap. I quite like how the high poly turned out, I am going to merge the bake with a texture normal for added effects. I also need to create a displacement map for the back plane.
For the light map for now I've just packed the uv shells. I will go back to it (its on my list) but I want to finish the quilt so I can put that in my scene and have all the main assets done and light mapped. All I need to worry about then is the texturing which hopefully wont take so long.
I think its safe to assume I wont have time to do a full exterior like I planned. I might be able to do some foliage for around the window. I think I need to accept that and focus on creating the interior to the best standard I can in the time frame left. I currently have 4 weeks left till hand in. Times dwindling!
So This is the fireplace fully working in UDK. I also fixed the wall. (scene doesn't have lighting built hence the dodgyness)

So I moved onto the quilt. I added volume to it. I quite like how its looking! I still need to combine some of the polys on the top/ add lumps and bumps. Currently I cant think of how to combine the polys in a way that would work but I think that's because its 3 in the morning and I am getting quite tired. On that note I think I will call it a night.

EXPOTEES! Also DUST!

I MADE THE SELECTION CUT FOR EXPOTEES!
YAY! 

Ahem so yea work! So yesterday I started a dust tutorial. I had attempted this before but got really confused. A friend tried to give me his particles that he made from this tutorial but for some reason that didn't work. I made the particle system as explained in the tutorial and then used this material and altered it slightly cause starting off it was waaaaayyy to bright and kind of looked like snow.
It took some time to create the bounding boxes for the particles as I didn't know the exact measurements for the house so it took some time trying to get that right as they would overlap and you would be able to see the dust on the exterior which isn't what I want as I want to be able to create some form of exterior, especially for ExpoTees.
So eventually I got the bounds sorted and I also lowered the emissive quite a lot in comparison to the original material. This was to help it look more believable and a lot less overpowering. in the end I changed the value to 0.5


Today I aim to finish the fireplace off and the duvet. These are the last of the meshes to be finished and imported. With the fireplace I just need to create the high poly and bake as well as the lightmap. The lightmap is what I am dreading the most as I am going to need each brick separate. Its defiantly going to take some time however its the first on my list as then at least it works in engine properly.

Saturday, 15 February 2014

In game view and the fireplace

Soi finished the door. I took the mossy decal off and will apply that as a decal within UDK. This way I can add it to the exterior if I get time. I hope I do but am still a long way off that :(

 After creating the door Diffuse I decided to add a few more assets around the scene.

 I did a quick in game test to see how it was looking and I must say once I have the ivy in there I think I will have got it to an acceptable standard. Still a ways off yet but ill get there.

 So I noticed I fell through the wall where the fireplace gap is and decided I need to get this modelled!
Here's how its going, had to re assemble it as I found a more efficient way of unwrapping it. its getting there, slowly. I should be able to finish it by tomorrow night.
I've decided to lower the fireplace to the ground in stead of adding rocks underneath, this is because of how it looked in UDK, it looked a little too high in relation to the player. Doing this will mean I need to go back into the 'Wall_Fireplace' mesh and remove the bottom part. Simple fix though.
 With a turbo-smooth of 6. In the morning I will go in and add chamfer lines to create the hard edges needed.